|
| How to remove background |
| Wednesday, January 20, 2010 |
There are cases when you have some image, logo, etc, with color background. And you have to delete that background, to remove it and make transparent gif or png image, or to replace it with background in some other color. Here is tutorial about removing the background with example. I have logo with white background and I will show here how to remove background from it and make transparent gif.
Here is how starting image looks like:

Now, I am picking Magic Wand Tool and click on white background. It selected white background but not inside parts of letters like ", P, O, etc. I will pick up those white space inside those letters. If letters are small and you need better look just increase zoom preview with scrolling the mouse wheel.

Now, Pick Rectagular Merquee Tool, right-click on image and pick "Select Inverse". That will turn your background selection to selecting all other parts of image. Again right-click and pick "Layer via copy". You just made new layer without background.
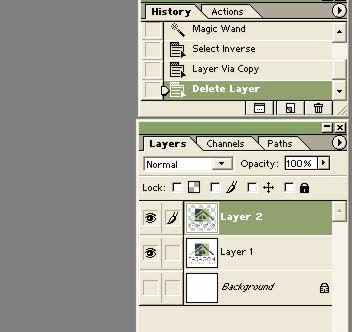
Now, click on Eye next to old layer with white background. That will make it invisible. You shall have the eye only in front of layer with empty background.
Then, just go to File - Save for web. There, pick Gif or PNG. Make shore you check box next to Transparency. And save it. You removed background from logo and made new image with transparence background.Labels: background, color, layers, tips, tutorial |
posted by acca @ 8:44 AM   |
|
|
|
|
| Make your own brush in Photoshop |
| Monday, February 26, 2007 |
Sometimes it's nice to have your own original Photoshop brushes. So, here's how you can make them if you decide to.
In AdobePhotoshop, create new document (you can do that with File-New, but also with Ctrl+N shortcut). Let it be with standard settings. Dimensions can be, lets say 150x150. You can make some different dimensions if you like, too.
Now, open some photo. Image with some clouds could be appropriate. Ctrl+U to make image black and white. In new window, set Hue and Saturation to lowest, and you'll get black-white picture. Than go to Image – Adjustments – Brightness and Contrast. You can adjust it whatever you like. Play with them. When you are finished with that, take lasso tool (keyboard shortcut is L) and select part you like to see as your new brush. Copy it and paste into new document.

Go to Edit – Define brush. You'll get new window where you can name your new brush. On left side you will see how your brush looks like. Go to OK and your brush will be saved in brush set you opened last time.
If you want have your own brush set, than delete default PS brushes after creating yours. After that, on Brush window go to Save brushes and chose name. Click on Reset defaults and load your brush set.
Default folder for brush sets is ...\adobe\photoshop 7.0\presets\brushes .Labels: brush, tips, tutorial |
| posted by acca @ 4:27 AM |
|
|
|
|
| Color Settings in Photoshop |
| Sunday, February 18, 2007 |
You can open Color settings dialog in AdobePhotoshop in Edit – Color settings. If you check Advanced mode, you'll see all possible options.
Bellow, you will see Working spaces (RGB, CMYK, Gray, Spot). That are color profiles when you are working on some images. It should be profiles with nice neutral component. Neutral colors are very important for pictures. When we are looking at some image, our brain see them first. If neutral colors are bad, viewer have impression whole picture is bad looking.

Let's see RGB Working space first.
- Adobe RGB 1998 – this is good choice when you have to correct some photo. Microsoft and HP tried to make average color profile for average color monitor with sRGBIEC61966. If Windows don't have chosen monitor profile in Display options, Windows suppose images are in sRGB. This profile is using for web. If that profile is chosen like working space, images in Photoshop will look same as in Macromedia DreamWeaver, for instance.
- Monitor RGB – profile name – there we can see what profile is in use. You can chose Monitor profile like working space, too, but that can be bad solution. Monitor profile don't have nice neutral, and have less gamut than prints.
- Load RGB and Save RGB – Usually, profiles are saved in Windows/System32/spool/driver/color/ directory. Here, you can save them, and load profiles from some other directory.
- Custom RGB – self-defining RGB working space.
In CMYK working space, we can see active working space. We can also load profile from some other location on disc, and isn't on profile list. We can make our own setting and save it as ICC profile – Custom CMYK. Custom CMYK offers profile name at first place.
Ink Options - Ink Colors – we use that for color definitions we will use in prints. Among standard color settings, we can save ours. That way, we can get better results in compare with predefined settings.
Dot Gain – racking percent of ink on paper. It's better to use Curves than Standard.
Separation Options
Separation Options: GCR - Gray Component Replacement / UCR - Under Color Removal – In UCR, black colors used only in neutral and dark parts of image. In GCR, black goes more into the picture. On places where Cyan, Magenta and Yellow are same, Photoshop «takes» some percent of CMY and adds K (black color).
UCR – nice for picture reparation where there are dark parts on image.
Black Generation in GCR sets black separation curve. Light is good setting for most images, because if we use harder black generation, we can get black in light parts of picture, too.
Black Ink Limit – sets K (black) on highest level.
Total Ink Limit – Maximum for total percentage. Cyan % + Magenta % + Yellow % + blacK % can't be more than Total Ink Limit. If our printer can't support more than 200% , we set Total Ink Limit to 200, and Photoshop won't exceed that in separation.Labels: basics, settings, tips |
| posted by acca @ 3:18 AM |
|
|
|
|
| Low RAM memory for Photoshop |
| Wednesday, November 22, 2006 |
While working in AdobePhotoshop, RAM memory can be problem sometimes. Free memory space in fact. To avoid that, or to set that kind of problems to minimum you can use some tricks. Clipboard buffer have to use as low space as it is possible. That means, you need to use COPY and PASTE rare. How to avoid COPY-PASTE? That can be simple. Use DRAG AND DROP Photoshop possibilities. You can use MOVE tool to drag whole layers from one file to another.
If you need to duplicate part of layer inside some file, select that part and use "Layer-New-Layer via copy", or "Layer - New - Layer via cut". Windows shortcuts for that will be Ctrl+J or Shift+Ctrl+J and MAC shortcuts are Command+J or Shift+Command+J. If you need to duplicate whole layer, drag thumbnail on New layer icon.
You can also use "Apply image" or Calculations on Image menu.
If you need to save parts of your work, need pictures of phases in your work, you can use Layer copy, and than hide one layer visibility, and continue working on another layer. When you need to see some older phase, just do that with layer visibility.
When you have to clean buffer for clipboard, Undo, Snapshot, History or Pattern, just go to "Edit-Purge" and click on what you want to clean. Your free RAM will become bigger momentary.Labels: tips |
| posted by acca @ 4:31 AM |
|
|
|
|
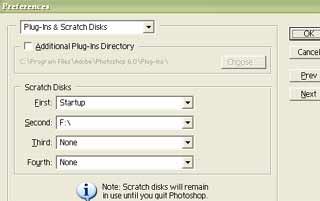
| "Your scratch disk is full" message |
| Tuesday, October 31, 2006 |

Scratch disks
You are finished work in Adobe Photoshop, and you need to save the file on disk. But trouble came. Message "Your scratch disk is full" showed on screen. You know that you have empty space on disk, but Photoshop won't let you to save the file. Problem is Photoshop have some problems working with disks. But here is easy solution. Make new document 1x1 pixels, and save it on disk in .psd format. That way, Fotoshop will delete older scratch and make new one. This time, very small one, too. Now, Photoshop will see empty space for saving your file.Labels: tips |
| posted by acca @ 6:00 AM |
|
|
|
|
| Adding new font in Photoshop |
| Friday, October 13, 2006 |
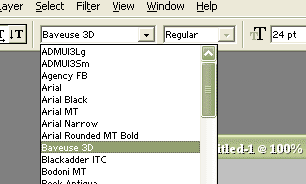
You have found some interesting font on net and you would like to use it in Photoshop. Easy. Download font, copy font in any folder and paste it in C:\WINDOWS\Fonts. If you downloaded font in zipped folder, than you can't do the paste function. Than, paste it in any folder on computer, first. Than, copy that pasted font and paste it in C:\WINDOWS\Fonts.
Open AdobePhotoshop. Pick up "Type tool". Now, in drop-down many you'll see your new font, and you will be able to use it in Photoshop work.
 Labels: tips |
| posted by acca @ 3:13 AM |
|
|
|
|
| AdobePhotoshop Windows keybord shortcuts |
| Monday, June 26, 2006 |
Fits image in window
Double-click , or Ctrl + Ø (zero)
100% magnification
Double-click "zoom tool", or Alt + Ctrl + Ø (zero)
Zooms in or out
Ctrl + "+" or "-"
Zoom in on specified area of an image
Ctrl + drag over preview in Navigator palette
Scrolls image with hand tool
Spacebar + drag, or drag view area box in Navigator palette
Scrolls up or down 1 screen
Page Up or Page Down
Scrolls up or down 10 units
"shift" + Page Up or Page Down
Moves view to upper left corner or lower right corner
Home or End
Constrains marquee to square or circle
"Shift" + drag
Draws marquee from center
Alt + drag
Snaps guide to ruler ticks
"shift" + drag guide
Toggles guide orientation
Alt + drag guide
Fill selection with foreground/background color
Alt + Backspace, or Ctrl + Backspace
Fills from history
Alt + Ctrl + Backspace
Displays Fill dialog box
"shift" + Backspace
Draws square slice
"shift" + drag
Draws from center outward
Alt + drag
Reposition slice while creating slice
Spacebar + drag
Opens context-sensitive menu
Right mouse button on slice
Toggles snap to slices on and off
Ctrl while drawing a sliceLabels: tips |
| posted by acca @ 5:25 AM |
|
|
|
|
|
|