|
| Make moving car gif animation |
| Friday, August 18, 2006 |
With Photoshop and Imageready you can make nice car moving animation.
Prepare car photo, and photo with road. Open them in Adobe Photoshop. With lasso tool, select just car and copy selected. Than paste into new file with transparent background.
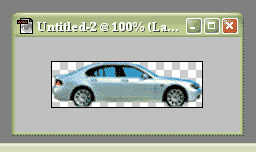
Change dimensions to fit nicely into road photo. Then, on road photo make new layer, and paste car into it. Jump to AdobeImageready.
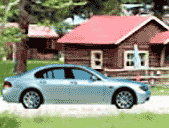
Put the car in the middle on the road, like on this picture.
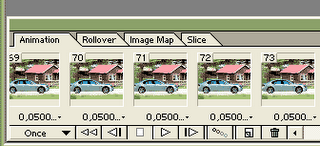
Then select Move tool, make car layer active, and move car with left arrow to left until you can see only few pixels of that layer. On animation window at bottom, set time for first frame on 1sec. Duplicate frame, set time to 0.05sec and move car layer to right one pixel. Make new frames that way until car gets to middle.
Then just save optimized. You will have gif animation like this .
If you like this tutorial, you can Digg it.Labels: tutorial |
posted by acca @ 3:59 PM   |
|
|
|
|
| Creating a droplet from an action |
| Wednesday, August 16, 2006 |
Photoshop Actions are the basis for creating droplets--you must create the desired action in the Actions palette prior to creating a droplet.
In Adobe ImageReady, you can also create droplets with the Optimize palette, so that you can apply Optimize palette settings to single images or batches of images.
To create a droplet from an action (Photoshop):
1 Choose File > Automate > Create Droplet.
2 Click Choose in the Save Droplet In section of the dialog box, and select a location to save the droplet. (The droplet icon will appear in the selected location.)
3 Select the desired set and action from the Set and Action menus.
4 Set Play options for the droplet:
Select Override Action "Open" Commands if you want Open commands in the action to refer to the batched files, rather than the filenames specified in the action. Deselect Override Action "Open" Commands if the action was recorded to operate on open files or if the action contains Open commands for specific files that are required by the action.
Select Include All Subdirectories to process files in subdirectories.
Select Suppress Color Profile Warnings to turn off display of color policy messages.
5 Select a destination for the processed files from the Destination menu:
None to leave the files open without saving changes (unless the action included a Save command).
Save and Close to save the files in their current location.
Folder to save the processed files to another location. Click Choose to specify the destination folder. Select Override Action "Save In" Commands if you want Save As commands in the action to refer to the batched files, rather than the filenames and locations specified in the action. Deselect Override Action "Save In" Commands if the action contains Save As commands for specific files that are required by the action.
6 If you chose Folder as the destination, specify a file-naming convention and select file compatibility options for the processed files:
For File Naming, select elements from the pop-up menus or enter text into the fields to be combined into the default names for all files. Elements include document name, serial number or letter, file creation date, and file extension.
For File Name Compatibility, choose Windows, Mac OS, and UNIX to make filenames compatible with Windows, Mac OS, and UNIX operating systems.
7 Select an option for error processing from the Errors pop-up menu:
Stop for Errors to suspend the process until you confirm the error message.
Log Errors to File to record each error in a file without stopping the process. If errors are logged to a file, a message appears after processing. To review the error file, click Save As and name the error file.Labels: tutorial |
| posted by acca @ 3:44 PM |
|
|
|
|
| Brush strokes - Sprayed strokes |
| Friday, August 11, 2006 |
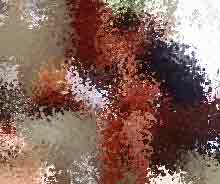
In Photoshop, you can make nice "thru window" effect with Brush strokes filter. When photo is open, go to Filter - Brush strokes - Sprayed strokes. In firs case, I will setup Stroke length and Spray radius to 0. You see the effect.
Other picture is after setup Stroke length to 0 and Spray radius to 10. Brush effect here is very interesting and I'm shore you will find useful in some situations.
 Labels: tutorial |
| posted by acca @ 2:23 AM |
|
|
|
|
| How to make animated gif avatar |
| Monday, August 07, 2006 |
In this tutorial I will show you how to make animated avatar in Photoshop. Let's start. Open Adobephotoshop. Make new file, 100x100. White background. Pick Type tool, and type something. In this case, I typed "Jo!". Like you see, that is in another layer. Now go to File-Jump to AdobeImageready. In Adobe Imageready, at the bottom click on "Duplicates current frame" (see picture).

Now you have 2 frames. Click on first frame, and make it active. On right, on Layers palette, make letters layer invisible. Below first frame, click and setup "Selects frame delay time" on 0.5 seconds, and 2nd frame on 1 second (see another picture).

You can preview animation on "Play animation" and if you are satisfied, save it (Save optimized as). This is where you can find "Jo!" gif AdobeImageready animation . Ofcourse, you can make animation with several Adobefotoshop layers (frames), not just one.Labels: tutorial |
| posted by acca @ 4:04 PM |
|
|
|
|
|
|


