|
| How to make pale, bleakly, luridly photo in Photoshop |
| Wednesday, July 26, 2006 |
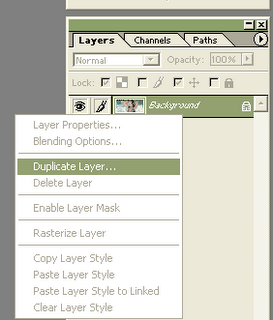
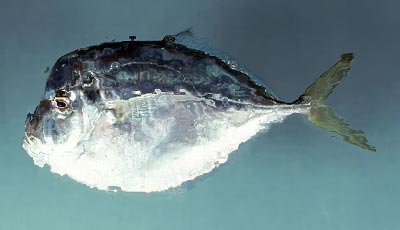
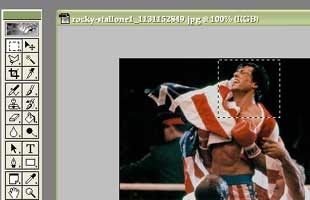
You have regular photo, and you need to make pale, bleakly or luridly photo. It can be done just in few steps in AdobePhotoshop. Open photo in Photoshop. On Layer, right-click and duplicate background layer (see first pic). Click eye in front of first background to become invisible. Now, on Opacity, low value where you want. You can preview at the moment, so you see what value of opacity you want. That is procedure if you want transparent pale picture. If you want not transparent, just make another layer, and fill it white. Than, put it at bottom of all layers. Save photo, and that's for today from AdobePhotoshop blog.
 Labels: tutorial |
posted by acca @ 6:00 PM   |
|
|
|
|
| Remove - erase date from photo with Photoshop |
| Tuesday, July 25, 2006 |
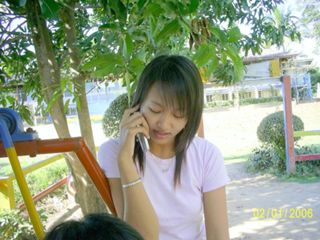
You have photo you made with your digital camera, but you have date on it, and you want to erase it. So, how to remove date from photos? Easy. Open photo in AdobePhotoshop, and zoom it to see date clearly. Pick up Clone stamp tool (see pic).
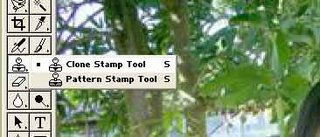
Now, hold ALT and click left mouse close near date on photo. Move on date, and just click left mouse. You see? That part where you clicked with ALT, copied there where date was. Now you see procedure. Just do it few times, and you will get clear photo without date on it.
 Labels: tutorial |
| posted by acca @ 8:18 AM |
|
|
|
|
| Contest for CD cover design in Photoshop |
| Saturday, July 22, 2006 |
Janet was really inspired by fan-created art that was being posted to her bulletin board, and thought it would be fun to give fans a chance at designing the cover of her new album "20 Years Old".
You can design cover in:
Photoshop Elements 4.0
Adobe Photoshop CS2
Adobe Illustrator CS2
Freehand MX
Fireworks
Canvas
GNU Image Manipulation Program
The winning design may be electronically recreated in a high-resolution format with graphic elements added. In the event any winning design is not used, the applicable winner(s) will receive an autographed copy of the winner's winning design plus Janet Jackson's entire album catalog on CD which represents the Sponsor's entire liability in such event (ARV $130.00 each). Sixteen (16) Runner-Up Prizes: entire album catalog on CD (ARV: $130.00 each). Total ARV of all prizes: $2,600.00.
more on design contest |
| posted by acca @ 5:01 PM |
|
|
|
|
| Enhance Your Digital Photos With Photoshop CS |
| Saturday, July 15, 2006 |
Enhance Your Digital Photos With Photoshop CS
by: Granny's Mettle
Digital cameras are wonderful items to have. Unlike before when you have to content yourself with what the developer has produced from your roll of film, nowadays, we have the flexibility to do whatever we want to do with our photos. You could enhance the color, perhaps, or cut out unwanted people and things from the photos. You could also take away the face of the girl from the photo of the man you’re fascinated with and exchange it with your face instead. The enhancements that can be made are limitless.
For Photoshop CS, you could take your digital photos to new heights with the software’s features and tools. To get the most out of the application, here are a few suggestions:
* To lighten dark photos, open the photo you want to edit and select Image from the main toolbar. Then, click Adjustments, and then select Brightness/Contrast. Just adjust according to your preference, and until your are satisfied with your photo.
* To add more color, click on Image from the main toolbar. Then choose Adjustments, followed by Match Color. Increase and decrease the Color Intensity setting until you’ve reached your satisfaction.
* When removing the background from your photo, or a person or thing, select Pen Tool from the Tools panel on your screen. Using the tool, start on one side of the object and click around the outline. This will extract the object you want removed. Take note that this is a delicate process. The more accurate your outline, the better your final image will be. Zooming in would also help you get an accurate outline.
* To optimize your photos for the Web, Photoshop has an image optimizer that can reduce the file size that usually slows down the loading time in the Web. When your dealing with the web, time is of the essence. The software reduces the size of the file while preserving the quality of the image.
To do this, open your image and choose File from the main menu. Select Save for Web. A new window will open with some basic presets. Select then the file size you need and save the document.
Doing these suggestions can help you enhance your digital photos. And if you’re one of the unfortunate ones and still don’t have a digital camera, you can still use the tips. Just scan your photos to 300 dpi for best results.
About Los Angeles Printing Services
Our Company is a Los Angeles based company that specializes in commercial printing and graphic design. Our mission is to provide clients with high quality printed outputs and professional web and graphic designs utilizing efficient and productive staff, up-to-date software programs, and the latest printing equipment and technology. For inquiries and online pricing for your projects, please visit www.losangelesprintingservice.com.
_________________________
ArticleCityLabels: tutorial |
| posted by acca @ 4:10 PM |
|
|
|
|
| Disable Get Info Comment Plug-in for Mac |
|
For Photoshop 6.0.1 "By default, Photoshop will always write information about the document into the Comments field shown in the Finder's Get Info dialog for the document. There are a number of file servers that provide AFP services on computers running other operating systems; some of them do not correctly handle files which have comments in the Get Info information."
System requirements:
Adobe Photoshop 6.0.1 for Macintosh
download here |
| posted by acca @ 8:12 AM |
|
|
|
|
| How to make avatar in Photoshop |
| Saturday, July 08, 2006 |
Supposed you have picture 350x278 and you want to make avatar for some forum, MSN, Yahoo, ... Open that photo in Fotoshop, pick Rectangular marquee tool and make a square on part of photo you like for your avatar. Go to Image-Crop. Now, go to Image-Image size and make Width and Height what you need (100x100, 80x80, ...). Look at Constrain Proportions. If that is checked, pic proportions will remain the same. If not, you can make perfect dimensions like 80x80, or 50x50. Play with that Photoshop ability, and look at the results. When you're done, just save on File-Save for web.Labels: tutorial |
| posted by acca @ 4:48 AM |
|
|
|
|
| Adobe Photoshop 9.0.1 (CS2) update |
| Monday, July 03, 2006 |
Adobe Photoshop 9.0.1 update fixes problems discovered in Fotoshop CS2 (9.0).
- Hanging when using painting tools with quick strokes.
- A runtime error that sometimes appear when mousing over a high-resolution document with the Brush tool.
- Quickly opening documents containing a large number of text layers.
- Problems related to palettes.
- Opening of TIFF files from certain scanners.
- Slow performance when toggling layer visibility.
and much more problems are fixed in 9.0.1 updateLabels: dowload |
| posted by acca @ 3:28 AM |
|
|
|
|
| Plastic fotoshop button 4 |
| Saturday, July 01, 2006 |

Chose Gradient Tool [G], click [D], and than [X] to setup default colors (white-black). Go to Options and set "Foreground to transparent". Make gradient from up to down. Create new layer and holding [Ctrl] click on layer with circle, fill it black and chose Select > Modify > Contract. Let contraction be 3 pixels. Go to Select > Feather and make it 5. Click [Delete] and deselect. Set Opacity on 30% and you will get button like on this picture.Labels: tutorial |
| posted by acca @ 5:16 AM |
|
|
|
|
|
|