|
| Low RAM memory for Photoshop |
| Wednesday, November 22, 2006 |
While working in AdobePhotoshop, RAM memory can be problem sometimes. Free memory space in fact. To avoid that, or to set that kind of problems to minimum you can use some tricks. Clipboard buffer have to use as low space as it is possible. That means, you need to use COPY and PASTE rare. How to avoid COPY-PASTE? That can be simple. Use DRAG AND DROP Photoshop possibilities. You can use MOVE tool to drag whole layers from one file to another.
If you need to duplicate part of layer inside some file, select that part and use "Layer-New-Layer via copy", or "Layer - New - Layer via cut". Windows shortcuts for that will be Ctrl+J or Shift+Ctrl+J and MAC shortcuts are Command+J or Shift+Command+J. If you need to duplicate whole layer, drag thumbnail on New layer icon.
You can also use "Apply image" or Calculations on Image menu.
If you need to save parts of your work, need pictures of phases in your work, you can use Layer copy, and than hide one layer visibility, and continue working on another layer. When you need to see some older phase, just do that with layer visibility.
When you have to clean buffer for clipboard, Undo, Snapshot, History or Pattern, just go to "Edit-Purge" and click on what you want to clean. Your free RAM will become bigger momentary.Labels: tips |
posted by acca @ 4:31 AM   |
|
|
|
|
| Explosion in Photoshop |
| Wednesday, November 15, 2006 |
How to make explosion in AdobePhotoshop?
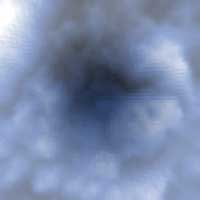
In this tutorial, I will explain you how to make nice "explosion" effect in Photoshop. First, open new document, 200x200 pixels, RGB mode, 75 pixel/inch. Setup Foreground color to black, and Background color white. That you can do with simple click "D".
Now, activate Filters - Render - Clouds. You will get image like this:

After that, activate "Filters - Render - Difference Clouds". Apply Difference Clouds filter 3 times to image. That is easier to do with clicking Ctrl+F 3 times and your image will look like this:

We are getting to next step, and that's activating "Image - Adjustments - Levels". Simple Ctrl+L will open dialog-box, and there set to RGB, Input levels to 11 - 1,23 - 178, and Output levels to 0 - 255. Click OK.

Now, in your Photoshop, activate "Image - Adjustments - Invert". Shortcut for that is Ctrl+I. And after that you'll get something like this:

Go to "Filters - Stylize - Extrude " and set up:
Type - blocks
Size - 3 pixels
Depth - 52 - Level-based
Solid front faces.
Result should be this kind of picture:

Copy layer (Layer - Duplicate Layer). Activate new layer and Add a layer mask. Activate Gradient Tool, pick Black, White colors with Radial Gradient. Now, goto "Image - Adjustments - Hue/Saturation" (Ctrl+U), and in dialog-box adjust:
Check both, "Colorize" and "Preview".
Hue - 222
Saturation - 42
Lightness - 0.
Click OK and you'll see this image:

Merge both layers with "Layer - Flatten Image". Also, open "Filter - Blur - Radial Blur" and set to:
Amount - 10
Blur method - Zoom
Quality - Good.
This is next image you shall see then:
To change from blue color, just go to "Image - Adjustments - Invert", or click Ctrl+I and you will see :

And final step is "Image - Adjustments - Variations " where you shall click "More Yellow" and "More Red" few times. There you have preview so you can play with that until you get satisfied with final result. Here is mine final explosion image:
 Labels: tutorial |
| posted by acca @ 9:56 AM |
|
|
|
|
| Creating a layer set |
| Thursday, November 09, 2006 |

How to create a layer set
More layers you have, more difficult is to organize them. There is set function in Photoshop and you can group layers in sets with it. Here is how you can do that.
- To create set, click "New Layer Set" button in Layers palette.
- For adding layer in set, drag layer to top of set.
- To create new layer, select set and click "New Layer" button.
- To remove layer from set, drag it out of set.
- You can drag whole set just like you drag single layer.
- If you have more than one set, you can mark them with different colors, for more convenience in work. Double click on set title and chose color in "Layer Set Properties" dialog box.
- You can add "Mask layer" to set, just like to single layer.
- You can "lock" whole set, too.
- You can not apply layer effect to whole set in once. |
| posted by acca @ 5:13 AM |
|
|
|
|
|
|


