|
| Make your own brush in Photoshop |
| Monday, February 26, 2007 |
Sometimes it's nice to have your own original Photoshop brushes. So, here's how you can make them if you decide to.
In AdobePhotoshop, create new document (you can do that with File-New, but also with Ctrl+N shortcut). Let it be with standard settings. Dimensions can be, lets say 150x150. You can make some different dimensions if you like, too.
Now, open some photo. Image with some clouds could be appropriate. Ctrl+U to make image black and white. In new window, set Hue and Saturation to lowest, and you'll get black-white picture. Than go to Image – Adjustments – Brightness and Contrast. You can adjust it whatever you like. Play with them. When you are finished with that, take lasso tool (keyboard shortcut is L) and select part you like to see as your new brush. Copy it and paste into new document.

Go to Edit – Define brush. You'll get new window where you can name your new brush. On left side you will see how your brush looks like. Go to OK and your brush will be saved in brush set you opened last time.
If you want have your own brush set, than delete default PS brushes after creating yours. After that, on Brush window go to Save brushes and chose name. Click on Reset defaults and load your brush set.
Default folder for brush sets is ...\adobe\photoshop 7.0\presets\brushes .Labels: brush, tips, tutorial |
posted by acca @ 4:27 AM   |
|
|
|
|
| Color Settings in Photoshop |
| Sunday, February 18, 2007 |
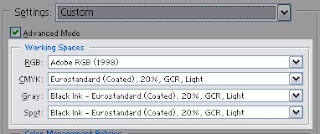
You can open Color settings dialog in AdobePhotoshop in Edit – Color settings. If you check Advanced mode, you'll see all possible options.
Bellow, you will see Working spaces (RGB, CMYK, Gray, Spot). That are color profiles when you are working on some images. It should be profiles with nice neutral component. Neutral colors are very important for pictures. When we are looking at some image, our brain see them first. If neutral colors are bad, viewer have impression whole picture is bad looking.

Let's see RGB Working space first.
- Adobe RGB 1998 – this is good choice when you have to correct some photo. Microsoft and HP tried to make average color profile for average color monitor with sRGBIEC61966. If Windows don't have chosen monitor profile in Display options, Windows suppose images are in sRGB. This profile is using for web. If that profile is chosen like working space, images in Photoshop will look same as in Macromedia DreamWeaver, for instance.
- Monitor RGB – profile name – there we can see what profile is in use. You can chose Monitor profile like working space, too, but that can be bad solution. Monitor profile don't have nice neutral, and have less gamut than prints.
- Load RGB and Save RGB – Usually, profiles are saved in Windows/System32/spool/driver/color/ directory. Here, you can save them, and load profiles from some other directory.
- Custom RGB – self-defining RGB working space.
In CMYK working space, we can see active working space. We can also load profile from some other location on disc, and isn't on profile list. We can make our own setting and save it as ICC profile – Custom CMYK. Custom CMYK offers profile name at first place.
Ink Options - Ink Colors – we use that for color definitions we will use in prints. Among standard color settings, we can save ours. That way, we can get better results in compare with predefined settings.
Dot Gain – racking percent of ink on paper. It's better to use Curves than Standard.
Separation Options
Separation Options: GCR - Gray Component Replacement / UCR - Under Color Removal – In UCR, black colors used only in neutral and dark parts of image. In GCR, black goes more into the picture. On places where Cyan, Magenta and Yellow are same, Photoshop «takes» some percent of CMY and adds K (black color).
UCR – nice for picture reparation where there are dark parts on image.
Black Generation in GCR sets black separation curve. Light is good setting for most images, because if we use harder black generation, we can get black in light parts of picture, too.
Black Ink Limit – sets K (black) on highest level.
Total Ink Limit – Maximum for total percentage. Cyan % + Magenta % + Yellow % + blacK % can't be more than Total Ink Limit. If our printer can't support more than 200% , we set Total Ink Limit to 200, and Photoshop won't exceed that in separation.Labels: basics, settings, tips |
posted by acca @ 3:18 AM   |
|
|
|
|
| Add rain on photo - how to |
| Saturday, February 03, 2007 |
You have a photo with nature, beautiful sea sigh on sunny day. And for some reason, you would like to add rain on that photo. You can do that, of course, in Adobe Photoshop.
Open Fotoshop. Open picture. Make new layer (shortcut is Ctrl+Shift+N) .
Go to Filter – Noise – AdNoise. Set Amount to 750, Distribution to Gaussian and check Monochromatic. Of course, click OK.
Open Filter drop-down menu, and there go Blur – Motion blur. There set Angle to 70 degrees and Distance to 30 pixels. OK again.
On Layer1, set Blending mode on Screen, to remove black color.
Now, you see some kind of rain on photograph, but drops are too big and it's too sunny for rainy day.
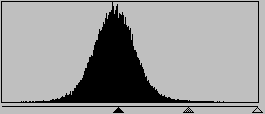
Click combination CTRL + L and set levels like on this pic.

Move black triangle to middle and rain drops will become thinner.
Now, make another new layer. Click D to reset colors. In Tools palette, select Linear Gradient. Drag with mouse from top to somewhere near middle of image. Blending mode set to Multiply and Opacity set to 75%.
Now, duplicate Layer1. You can do that easy dragging it on New layer icon at bottom.
Click CTRL + T combination to make that layer bigger.
Duplicate that layer again and make it bigger again.
See what you have done. If needed, set Levels on new layers the best way.Labels: tutorial |
posted by acca @ 4:40 AM   |
|
|
|
|
|
|


