|
| Oregon photoshopped |
| Thursday, November 01, 2012 |
Beautiful photos can be even more stunning after good retouch in Photoshop. Here are several very nice photos of Bend Oregon, Portland Oregon and other OR places, taken with camera and then handled with Photoshop so they are real masterpieces now.
Railway in Central Area, Salem, Oregon.
Wheel of Ferris, taken at Salem Oregon State Fair.
Read more »Labels: photoshop |
posted by acca @ 3:56 AM   |
|
|
|
|
| Adobe Photoshop CS 5.5 Assurance Promotion |
| Saturday, March 24, 2012 |
With the Creative Suite Assurance Promotion, customers no longer need to worry about purchasing the latest Creative Suite version as they will receive a complimentary upgrade to CS6 upon release.
Beginning Monday - Customers who purchase Creative Suite 5.5 (CS5.5) software will receive a complimentary upgrade to CS6 when it becomes available. No coupon code necessary, offer valid in North America and the European country stores:
Austria, Belgium, Czech Republic, Denmark, Finland, France, Germany, Ireland, Italy, Luxembourg, Netherlands, North America, Norway, Poland, Portugal, South Africa, Spain, Sweden, Switzerland, Turkey, and The UK.
Offer available March 26, 2012 through May 6, 2012
North America Store: Buy CS5.5 now and get CS6 at no additional cost. Offer ends May 6, 2012.
European Store: Buy CS5.5 now and get CS6 at no additional cost. Offer ends 6 May, 2012.Labels: Adobe, cs5.5, photoshop, promotion |
posted by acca @ 1:22 AM   |
|
|
|
|
| Great March Adobe Offers (Photoshop CS5.5, Lightroom, ...) |
| Tuesday, February 21, 2012 |
CS5.5 PRODUCTION PREMIUM/PREMIERE PRO OFFER
Now Live - Save 50% on a full version of Adobe Creative Suite 5.5 (CS5.5) Production Premium or Premiere Pro in the North America Commercial store. Offer code SWITCH must be applied at checkout.
Offer available through March 2, 2012
50% off Premiere Pro, full version. Coupon code SWITCH. Ends Mar 2
50% off Premiere Pro, full version. Coupon code SWITCH.
Ends Mar 2.
WEB PREMIUM OFFER
Now Live - Take 50% off the full version of Adobe Creative Suite 5.5 Web Premium in the North America Commercial Store. Coupon code FEB50WP must be applied at checkout.
Read more »Labels: Adobe, cs5.5, lightroom, photoshop, store |
posted by acca @ 11:46 AM   |
|
|
|
|
| Free online Photoshop training sessions |
| Friday, May 20, 2011 |
Customers who purchase Photoshop CS5 or Photoshop CS5 Extended can receive 3 free online training sessions from the National Association of Photoshop Professionals (NAPP). Available in the Adobe North America Commercial and Education Stores only. Customers will receive an e-mail with instructions for registering for the webinars within two weeks of purchase.
Offer available May 19, 2011 - June 9, 2011
Also, when we are talking about Photoshop specials, here's another:
Adobe Spring Special for one week
Read more »Labels: photoshop, special |
posted by acca @ 12:40 PM   |
|
|
|
|
| Creating Stunning Monochromatic Images in Photoshop CS4 |
| Thursday, July 08, 2010 |
 
Great paperback book: Black and White in Photoshop CS4 and Photoshop Lightroom: A Complete Integrated Workflow Solution For Creating Stunning Monochromatic Images in Photoshop CS4, Photoshop Lightroom, and Beyond.
Book author: Leslie Alsheimer
Publisher: Elsevier Science LtdLabels: book, CS4, photoshop |
posted by acca @ 1:27 AM   |
|
|
|
|
| Save on Adobe MAX 2009 full conference pass |
| Tuesday, July 14, 2009 |
Purchase qualifying products and save $400 on an Adobe MAX 2009 full conference pass when you enter Promotion Code: AST922.
*Offer Terms and Conditions
This offer applies to the regular full conference pass registration price only, resulting in a savings of US$400 off the regular full conference pass registration price of US$1,495. You must enter promotion code AST922 at the start of the MAX 2009 online registration process to receive your discount.
Only one product purchase qualifies and only the following Adobe products qualify for this promotion: Acrobat 9 Pro Extended; After Effects CS4; Adobe Captivate 4; ColdFusion 8 Enterprise Edition; ColdFusion 8 Standard Edition; Creative Suite 4Design Premium; Creative Suite 4 Design Standard; Flash Media Interactive Server 3.5; Flash Media Streaming Server 3.5; Flex Builder 3 Professional; Adobe Font Folio 11;Illustrator CS4; InDesign CS4; Creative Suite 4 Master Collection; Photoshop CS4; Photoshop CS4 Extended; Creative Suite 4 Production Premium; Creative Suite 4 Web Premium; Creative Suite 4 Web Standard. Offer expires 11:59 p.m. PST October 2, 2009.
Offer is not transferrable and valid only for individual product purchaser in possession of a valid purchase confirmation. Only purchases made through the Adobe Store North America. Offer cannot be combined with any other offer and is void where prohibited.
Purchase qualifying products and save $400 on an Adobe MAX 2009 full conference pass when you enter Promotion Code: AST922.Labels: Adobe, coupon, photoshop, promotion |
posted by acca @ 4:37 PM   |
|
|
|
|
| What is Camera Raw |
| Thursday, December 04, 2008 |
Camera Raw software is included as a plug-in with Adobe After Effects and Adobe Photoshop, and also adds functionality to Adobe Bridge. Camera Raw gives each of these applications the ability to import and work with camera raw files. You can also use Camera Raw to work with JPEG and TIFF files.
Camera Raw supports images up to 65,000 pixels long or wide and up to 512 megapixels. Camera Raw converts CMYK images to RGB upon opening. For a list of supported cameras, see adobe.com/go/learn_ps_cameraraw.
You must have Photoshop or After Effects installed to open files in the Camera Raw dialog box from Adobe Bridge. However, if Photoshop or After Effects is not installed, you can still preview the images and see their metadata in Adobe Bridge. If another application is associated with the image file type, it’s possible to open the file in that application from Adobe Bridge.
Using Adobe Bridge, you can apply, copy, and clear image settings, and you can see previews and metadata for camera raw files without opening them in the Camera Raw dialog box. The preview in Adobe Bridge is a JPEG image generated using the current image settings; the preview is not the raw camera data itself, which would appear as a very dark grayscale image. A caution icon appears in the thumbnails and preview image in the Camera Raw dialog box while the preview is generated from the camera raw image.
You can modify the default settings that Camera Raw uses for a particular model of camera. For each camera model, you can also modify the defaults for a particular ISO setting or a particular camera (by serial number). You can modify and save image settings as presets for use with other images.
When you use Camera Raw to make adjustments (including straightening and cropping) to a camera raw image, the image’s original camera raw data is preserved. The adjustments are stored in either the Camera Raw database, as metadata embedded in the image file, or in a sidecar XMP file (a metadata file that accompanies a camera raw file). For more information, see “Specify where Camera Raw settings are stored” on page 102.
After you process and edit a camera raw file using the Camera Raw plug-in, an icon appears in the image thumbnail in Adobe Bridge.
If you open a camera raw file in Photoshop, you can save the image in other image formats, such as PSD, JPEG, Large Document Format (PSB), TIFF, Cineon, Photoshop Raw, PNG, or PBM. From the Camera Raw dialog box in Photoshop, you can save the processed files in Digital Negative (DNG), JPEG, TIFF, or Photoshop (PSD) formats.
Although Photoshop Camera Raw software can open and edit a camera raw image file, it cannot save an image in a camera raw format.
As new versions of Camera Raw become available, you can update this software by installing a new version of the plugin.
You can check for updates to Adobe software by choosing Help > Updates. Different camera models save camera raw images in many different formats, and the data must be interpreted differently for these formats. Camera Raw includes support for many camera models, and it can interpret many camera raw formats.
About camera raw files
A camera raw file contains unprocessed, uncompressed grayscale picture data from a digital camera’s image sensor, along with information about how the image was captured (metadata). Photoshop Camera Raw software interprets the camera raw file, using information about the camera and the image’s metadata to construct and process a color image.
Think of a camera raw file as your photo negative. You can reprocess the file at any time, achieving the results that you want by making adjustments for white balance, tonal range, contrast, color saturation, and sharpening. When you adjust a camera raw image, the original camera raw data is preserved. Adjustments are stored as metadata in an accompanying sidecar file, in a database, or in the file itself (in the case of DNG format).
When you shoot JPEG files with your camera, the camera automatically processes the JPEG file to enhance and compress the image. You generally have little control over how this processing occurs. Shooting camera raw images with your camera gives you greater control than shooting JPEG images, because camera raw does not lock you into
processing done by your camera. You can still edit JPEG and TIFF images in Camera Raw, but you will be editing pixels that were already processed by the camera. Camera raw files always contain the original, unprocessed pixels from the camera.
To shoot camera raw images, you must set your camera to save files in its own camera raw file format.
The Photoshop Raw format (.raw) is a file format for transferring images between applications and computer platforms. Don’t confuse Photoshop raw with camera raw file formats.
Digital cameras capture and store camera raw data with a linear tone response curve (gamma 1.0). Both film and the human eye have a nonlinear, logarithmic response to light (gamma greater than 2). An unprocessed camera raw image viewed as a grayscale image would seem very dark, because what appears twice as bright to the photosensor and computer seems less than twice as bright to the human eye.Labels: Adobe After Effects, photoshop |
posted by acca @ 11:57 AM   |
|
|
|
|
| What is Photoshop.com |
| Saturday, October 04, 2008 |
Photoshop.com is the complete solution for managing, editing, storing, and sharing your photos online, with tutorials, inspiration and more. Photoshop.com is available from any web-enabled computer, compatible mobile phones, and directly from within Adobe® Photoshop® Elements 7 or Adobe Premiere® Elements 7 software. Organize, tweak, create, e-mail, display, and store--all with Photoshop.com.
Point a web browser at www.photoshop.com and you can set up a no-obligation free account in just a few minutes
The Photoshop.com service is currently available at two levels of membership--Basic and Plus. The Basic level is free, and the Plus level starts at $49.99 per year. You can also purchase additional storage space for both the Basic or Plus levels for an additional annual fee.
Both versions give you a personal URL to access your account; online private and public sharing, tutorials; online photo management, editing and interactive photo galleries; browser-based upload and download; anywhere access to your photos and videos from Photoshop Elements 7 and Premiere Elements 7, including syncing and backup from your desktop to the web; mobile access; and 2 GB of online storage space. The Plus version adds special artwork, album templates, and effects, and a total of 20 GB of online storage.
For the Basic membership, a total of 20 GB storage space is available $19.99 per year; 40 GB for $49.99 per year; and 100 GB for $99.99 per year. A Plus membership costs $69.99 per year with 40 GB included storage space, and $129.99 per year with 100 GB.
You may have already had a chance to use Photoshop Express Beta, and if so, Photoshop.com is going to be quite familiar to you. Basically, Photoshop Express is now the online editor component of the Photoshop.com services.
An Adobe ID is simply an email address and password combination you can use to access the wide world of Adobe products--including trial software downloads, hundreds of free product extensions, special community areas, and of course, online services such as Acrobat.com and Photoshop.com.
At this time, the Photoshop.com service is available in the English language and for US residents. Other languages and countries will be added in the future. You may be able to access Photoshop.com from outside the US, but as all data will have to travel to and from US-based servers, you may experience poor performance.Labels: fotoshop, photoshop |
posted by acca @ 7:03 AM   |
|
|
|
|
| All About Adobe Photoshop CS3 |
| Monday, June 02, 2008 |
Adobe Photoshop is a well known high quality software package for working with raster graphic images and bitmaps. Most people consider it a superiour product when compared with the existing competition and almost certainly the markets leading programme of its type. Photoshop is frequently used as a tool in graphic design, for manipulating and editing images and has wide applications. CS3 is the latest and greatest version of Adobe Photoshop at this time. CS3 which stands for "Creative Suit 3" is available with various developed software programmes and bundles from Adobe. There are several different bundles available but most of them are not incorporated with the version of either Adobe Photoshop or Adobe Photoshop CS3 Extended. It should also be noted that the Apple Macintosh computers and PC's running current versions of the Microsoft windows operating system are supporting the versions of CS3.
You can have quick advance compositing and quick selection tools by the use of Adobe Photoshop CS3 software. It comes with powerful editing tools, work flow enhancements and has a streamlined interference. The CS3 extended version provides great help to graphic and web designers, engineers and scientific researchers, medical and manufacturing professionals. Several useful features like spot-healing brush, smart objects, red-eye reduction and illustrator are all loaded into Adobe Photoshop CS3 software. Broadly speaking the products contained in Adobe Photoshop CS3 are intended for professional use but thats not saying you need proper training to get most out of this software. With Adobe Illustrator CS3, you can create sharp edged artistic illustrations like clip arts, cartoons and other geometric complex patterns. You can have complete color exploration environment with the help of this software, along with that it allows you to apply colors dynamically to selected objects. It should be noted that Adobe Photoshop CS3 is a very powerful programme which can in turn make it difficult to learn due to its sophistication.
---
Article by Kevin M. Sugrue
http://www.tutorialhell.comLabels: cs3, photoshop |
posted by acca @ 3:12 AM   |
|
|
|
|
| First Adobe Photoshop Plug-in |
| Thursday, February 28, 2008 |
First official Adobe Photoshop Plug-in was Force Black and White Extension Plug-in. It was released 12/4/1998 and it waight 32KB. Plugin was for Photoshop 5.0.x version and it was made for for Windows 95, Windows 98, or Windows NT 4.0 or later. Adobe described this plugin like following:
The algorithm used by Photoshop 5.0.x to determine the best set of colors when converting a document to Indexed Color mode using the Adaptive palette has changed to allow for a more representative sampling of colors. One side-effect of this improvement is that Photoshop no longer guarantees that the generated palette will contain a pure white color and a pure black color. Images with palettes that do not contain pure white and pure black may not work properly in some applications.Labels: photoshop, plug-in |
posted by acca @ 6:26 AM   |
|
|
|
|
| How to make logo in Photoshop |
| Sunday, July 01, 2007 |
You can find lots of software for instant logos, lots of people make logo in CorelDraw, but you can make nice logo for your website, firm, band or anything you want in Adobe Photoshop, too. Here is an example logo for MyFilmo.com.
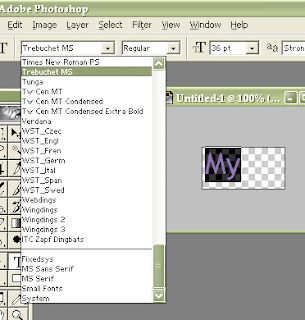
Open Photoshop. Open new document with transparent background, 100x50 pixels, like on this image.

I took Type tool and typed "My". Now, you can play with fonts here. Chose some nice font, chose regular, bold or whatever and chose size. I Choose Script MT Bold font for this part.

Make new layer and type "Filmo". Play with fonts again. I finally chose "Rockwell Condensed" font.
And third part, ".com" whitch I wrote with "Play Rus".
Right click on ".com" layer and pick "Free transform". I made it wider and less high to fit above two layers and to look nice into whole logo.
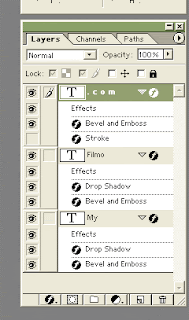
Now, we will play with layers and styles. Right click on layer and try different style. Play with that and when you like what you see, click OK and go to another layer. For this logo, I used "Bevel and Emboss", "Stroke" and "Drop shadow" effects. You can see on picture where I used which effect.

And finally, there is logo I made in Photoshop for MyFilmo.com.
 Labels: logo, photoshop, tutorial |
posted by acca @ 4:12 AM   |
|
|
|
|
| How to make an old paper in Photoshop |
| Monday, June 25, 2007 |
In this Photoshop tutorial, we'll make a nice old paper image. You'll learn how to make it, too, following instructions. Let's start.
Open AdobePhotoshop. Open New document, 150x200 pixels with white background.
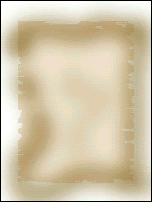
Create a new layer, pick Rectangular Marquee Tool, mark and paint selection in black. Just like on this image.

Deselect. Go to FILTER - BRUSHED STROKES - SPRAYED STROKES , and set:
Stroke Length to 10
Spray Radius to 15
Stroke Direction - Horizontal.
In Tools, pick "Magic Wand" and click inside black rectangular. Now, invert selection and click Delete. Deselect.

Go again from "FILTER - BRUSHED STROKES - SPRAYED STROKES" part but instead Stroke Direction Horizontal pick "Right Diagonal". Play with sliders a little to make nice effect.
CTRL + click on layer and pick Red:240, Green:225, Blue:205 color. Paint black rectangular.

Make new layer. In brush, pick Soft brush 45. Opacity to 20%. Mix Red:116, Green:74, Blue:0 color and paint edges.
CTRL Click on rectangular layer to load selection, invert it and delete.
Link layers and merge linked.
Go to FILTER - EFFECTS - Outer Glow. Mode - normal.
Opacity - 75%.
Blur - 1 pixels.
Intensity - 50%.
Now, go to FILTER - EFFECTS - Drop Shadow.
Mode - multiply.
Opacity - 50%.
Angle 135
Distance 7 pixels.
Blur 6.
Intensity 0%.
Now go to IMAGE - ADJUST - Brightness/Contrast, and add picture or text.

You just made old paper in Photoshop for your usage.Labels: photoshop, tutorial |
posted by acca @ 4:39 AM   |
|
|
|
|
| Layers as The Backbone Of Photoshop |
| Monday, June 11, 2007 |
Adobe Photoshop is not cheap. There are certainly more affordable photo editing software applications available on the Internet but there are reasons why Photoshop is so popular among professional web designers, photographers, and graphic design specialists, etc. The ability of Photoshop to allow you to work in layers makes otherwise complex designs easy.
If you are learning how to use Adobe Fotoshop to do your graphic designs than make sure you pay special attention to the section on how to use layers. To illustrate how layers work imagine you have a piece of paper. This piece of paper is your background. You could leave the background white or paint it any color you wish. Now, let’s assume you want to add a photograph of a sunset. Your photograph of the sunset is on a transparent paper and you lay it over the top of your background. The sunset image is on your first layer. Now, let’s assume you want to add some text. Your text is on another sheet of transparent paper and you lay it over the top. This is your second layer. You can add as many layers as you wish. You can also change the order of the layers. For example, if you decide you want the text layer to be behind the sunset layer you can move the layers easily with a few clicks of the mouse.
This is essentially the same way you create graphics and complex images in AdobePhotoshop. Adventage of layers is that if you decide for instance that you don’t want a sunset and you would rather have an image of a beach you can simply delete the sunset layer and add an a new layer for the beach image without disturbing the background or the text layer.
Working in Photoshop with layers allows you to experiment without fear of damaging your original image. Layers also allow the user to make changes without disrupting other elements of the image.
Article Source: http://www.kokkada.com
Master The Basics Of Adobe Photoshop In Under 2 Hours With Easy To Follow Instantly Accessible Online Video Tutorials. Full Details Here: www.learnphotoshopnow.com/ Photoshop TutorialsLabels: layers, photoshop |
posted by acca @ 9:23 AM   |
|
|
|
|
|
|


