|
| Plastic photoshop button - how to 3 |
| Friday, June 30, 2006 |
| On layers, change Color dodge and Opacity on 75%. Now, Photoshop lighting. Hold [Ctrl] and click layer with first circle. Chose Select > Modify > Contract and write 6 in dialog box. Unlike before, move selection up. Than hold [Ctrl] and [Alt] and click on layer with round. Than back new selection into circle. Go to Channels and create new channel. Color selection white. Deselect and change Filter > Blur > Gaussian Bluri make it 5. Chose Image > Adjust > Levels and Input Levels: 110, 1.00 i 150. Holding [Ctrl] click new channel, back to Layers and create new fotoshop layer. Labels: tutorial |
posted by acca @ 7:23 AM   |
|
|
|
|
| Plastic photoshop button 2 |
| Thursday, June 29, 2006 |

Check if Elliptical marquee tool is still selected. Than, with keyboard arrows move selection a little down. Maybe click just 2 or 3 times. Now hold [Ctrl] and [Alt] and click above Layer. You should get something like my pic here. Now with arrows move new selection up to first selection position like on seccon pic here.

Create new layer, select Select > Feather and make it 5. With Paint Bucket Tool fill new selection white. Deselect, chose Filter > Blur > Gaussian Blur, and write 5 in dialog box.Labels: tutorial |
| posted by acca @ 4:39 PM |
|
|
|
|
| Creating plastic buttons in Photoshop - 1 |
| Wednesday, June 28, 2006 |

Open Photoshop. Create new document 200x200 pixels, 72 dpi resolution. Create new layer and choose Elliptical marquee tool. Draw a circle. To make perfect round, hold [Shift] while creating. Click on foreground color, and in Color picker set RGB - 255, 125, 96. Choose Paint Bucket Tool and click inside circle to fill it with color.
Choose Select > Modify > Contract, and write 6. That will selection make smaller for 6 pixels.Labels: tutorial |
| posted by acca @ 1:47 PM |
|
|
|
|
| AdobePhotoshop Windows keybord shortcuts |
| Monday, June 26, 2006 |
Fits image in window
Double-click , or Ctrl + Ø (zero)
100% magnification
Double-click "zoom tool", or Alt + Ctrl + Ø (zero)
Zooms in or out
Ctrl + "+" or "-"
Zoom in on specified area of an image
Ctrl + drag over preview in Navigator palette
Scrolls image with hand tool
Spacebar + drag, or drag view area box in Navigator palette
Scrolls up or down 1 screen
Page Up or Page Down
Scrolls up or down 10 units
"shift" + Page Up or Page Down
Moves view to upper left corner or lower right corner
Home or End
Constrains marquee to square or circle
"Shift" + drag
Draws marquee from center
Alt + drag
Snaps guide to ruler ticks
"shift" + drag guide
Toggles guide orientation
Alt + drag guide
Fill selection with foreground/background color
Alt + Backspace, or Ctrl + Backspace
Fills from history
Alt + Ctrl + Backspace
Displays Fill dialog box
"shift" + Backspace
Draws square slice
"shift" + drag
Draws from center outward
Alt + drag
Reposition slice while creating slice
Spacebar + drag
Opens context-sensitive menu
Right mouse button on slice
Toggles snap to slices on and off
Ctrl while drawing a sliceLabels: tips |
| posted by acca @ 5:25 AM |
|
|
|
|
| Download free Photoshop brush |
| Thursday, June 22, 2006 |
| On this site you can download free Photoshop brushes for AdobePhotoshop 4+ , and for Fotoshop Elements. Those brushes can be used in Photo-Paint and Paint Shop Pro, too. Labels: dowload |
| posted by acca @ 8:23 AM |
|
|
|
|
| Crop picture/photo in AdobePhotoshop |
| Wednesday, June 21, 2006 |
I will explain here two ways for crop picture in Photoshop.
- First way is easy, but you have to be very precise. Just pick Rectangular marquee tool from tools palette, and make selection on photo you are working on. Select part you want to stay. Than, just go to Image-crop, and you're done. If you don't like what you're done, you always can go to Edit-Step backward.
- Another way is using crop tool. Pick it up from tools menu  (see picture) and make selection on photo. Now, you have 8 points where you can change selection, by pulling some point (color picture). (see picture) and make selection on photo. Now, you have 8 points where you can change selection, by pulling some point (color picture). 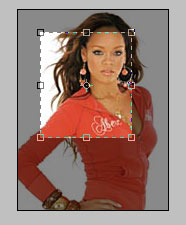 When you are finished with that, go to Image-crop, and you're done. When you are finished with that, go to Image-crop, and you're done.Labels: tutorial |
| posted by acca @ 3:02 PM |
|
|
|
|
| Pastel color on desktop |
| Monday, June 19, 2006 |
Open photo, picture or any file or software where you can see that pastel color you want on your desktop. "Print Screen" that.
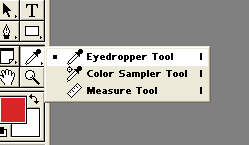
Than, open Photoshop, go to "File > New" , "OK" and "Ctrl+V" to open that clipboard pic on new file in Photoshop. Pick "Eyedropper Tool" from tools menu and click on wanted color.
Now, you should "File > New", with 1x1 pixel. Make it bigger just in view with "Ctrl+[+]" few times. Now, pick "Paint Bucket Tool" and click anywhere in that 1x1 square. When you're done, just save pic on computer.
To put that color on your desktop, right-click on DeskTop , chose "Properties". On "Background" card find pic on "Browse...". On "Picture Display" chose "Tile". |
| posted by acca @ 2:19 AM |
|
|
|
|
| Photoshop magnetic lasso tool tutorial |
| Friday, June 16, 2006 |
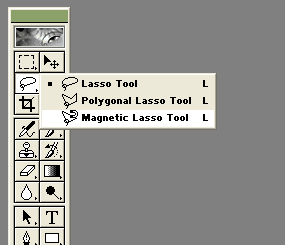
Unexperienced AdobePhotoshop users have problems with Magnetic lasso tool because they are trying to make very complicated selections. You have to know, this tool have it's limits. That's why I recommend you this time to chose some photo with big difference in colors (main part and background). Load that pick in Fotoshop. Chose Magnetic laso tool from palette. Than click anywhere between main caracter on your photo and background. Move the mouse by the line (don't have to hold mouse button, or click). Photoshop will make several control points on that line. If you make a mistake somewhere, just back cursor to last control point, and than move on further. If you don't like position of some control point, click BACKSPACE. And on left mouse click, you can put your own control points. When whole circle has made, just click on first controlpoint to close circle, or do left double-click.Labels: tutorial |
| posted by acca @ 10:47 AM |
|
|
|
|
| Download Free Photoshop Layer Styles |
|
| Many free free Fotoshop layer style and style sets for Adobe Photoshop and Photoshop Elements you can find on graphicssoft.about.com/od/photoshopstyles . Custom layer styles, Hammered Gold, Freshly Fallen Snow, Candy Cane, Fresh Squeezed, Verdigris Patina, Step into Spring, Paint Flecks, Ribbon, Pitted Gold, Gold Flecks, Aqua, Magenta, Antique Gold, Bubbles, Opalessence, Stone-Washed Denim, Clay, Leather Grain, Sundown, Plaid, Inset, Bevels, Bumpy Plastic, Snakeskin, Patterns, Magazine Text and many more. |
| posted by acca @ 1:24 AM |
|
|
|
|
| Color fill in Adobephotoshop - part 2 |
| Thursday, June 15, 2006 |
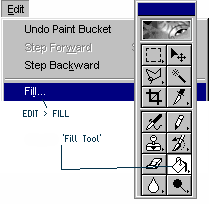
Another way is FILL command. Edit > Fill for filling with foreground color. In Photoshop 6+ , if you chose FILL command before selecting, you will fill whole layer. Shortcut for this command is Shift+Backspace.
Third possibility is Backspace. After selecting part of layer or part of background layer, if you press Backspace or Delete, you will fill it with background color. On other sorts of layers, press Ctrl+Backspace. If you want fill with foreground color, than click Alt+Backspace.Labels: tutorial |
| posted by acca @ 7:55 AM |
|
|
|
|
| Color filling in adobefotoshop/adobephotoshop |
| Tuesday, June 13, 2006 |

You can do color filling in Adobephotoshop with few different tools.
First is with "Paint Bucket Tool" (so called - "Fill tool"). This tool is on palette tools on same box with "Gradient tool". With "Paint Bucket Tool" you can fill some selection with foreground color or pattern just with choosing tool and then click on selection. You can also do color fill some spaces that are not selected, but have same color. For instance, if part of picture have some red pixels, and you chose blue as foreground color, than click on any red pixels, you will fill blue all red pixels.
Another way in next post.Labels: tutorial |
| posted by acca @ 12:09 PM |
|
|
|
|
| Adobefotoshop filters |
| Sunday, June 11, 2006 |
You can make really nice effect in Adobefotoshop with Photoshop's built in filters. With this effect, you can make photo looks like paint, aquarel, fresco, you can bring it more light from certain angles you like, ... In Adobephotoshop you can use plug-in filters, too. That are filters made by different software corporations, just for Fotoshop. When you install some of them, they will aper in Photoshop, and you will be able to use them, just like original Fotoshop filters. More about plug-in filters you can find if you choose in Photoshop menu : "Help"-"About Plug-ins".
Filters can not be used on bitmap images, or index color. |
| posted by acca @ 4:53 AM |
|
|
|
|
| Download Free Photoshop Album Starter 3.0 |
| Saturday, June 10, 2006 |
* Fix common photo flaws — like red eye, color, and brightness — in a single click.
* Easily share your memories! Attach photos to e-mail, or send them to mobile phones. Make your own prints, or order prints, photo books, and more online.
* Find any photo in a snap with automatic organization that lets you view all of your digital photos in one place using a familiar calendar view.
Download it hereLabels: dowload |
| posted by acca @ 3:08 AM |
|
|
|
|
| download Free Pattern Sets for Fotoshop/Photoshop |
| Tuesday, June 06, 2006 |
| Sue's Small Black & White Patterns includes stripes, checks, checkerboard, polka dots, stars, Fleur de lis, sun, line effect, line screen, snowflake, flower for AdobeFotoshop you can download free from Photoshop patterns . Labels: dowload |
| posted by acca @ 3:24 AM |
|
|
|
|
| creating transparent sphere in photoshop - part 4 |
| Saturday, June 03, 2006 |
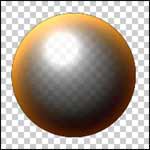
Open menu Image > Adjust > Auto Levels.
Copy layer LIGHT and setup blending mod of new layer on Color Dodge, and OPACITY on 50%.
You are done now with your sphere, and we are done with this Adobe photoshop tutorial.Labels: tutorial |
| posted by acca @ 2:47 AM |
|
|
|
|
| creating transparent sphere in photoshop - part 3 |
| Friday, June 02, 2006 |
Setup transparency of layer SHADOW on 60% and drag it on button for new layer to copy. Setup transparency of new layer on 15% and MOD on Color Burn.
Holding CTRL click on original BALL layer. Create new layer on top, and rename it in LIGHT. Chose black foreground color and fill new layer with Alt+Backspace. Setup blending mod on Screen, and deselect. Change layer transparency Opacity on 60%.
Chose Filter > Render > Lighting Effects, change light in Omni, and intesity to 100. Move light in top-left corner. Make light bigger with mouse.
Material:
Gloss: 100
Material: -100
Ambience: 0
Exposure: 0Labels: tutorial |
| posted by acca @ 3:19 AM |
|
|
|
|
| Restore Old Photos with Photoshop |
| Thursday, June 01, 2006 |
How to Restore Old Photos with Photoshop
by: Michael Wysmierski
There are times that people may have old photographs they would like to restore to save the memories. Photos usually get damaged through the times. The pictures may get blurred, the color fades and the picture might acquire marks and scratches. Thank the technology of today. People can now save and restore their old photos with the help of Photoshop.
Here are some steps to follow in restoring old pictures using the Photoshop.
1. The person may use the Elements in Photoshop, which are Dust and Scratch Filter to remove the marks, scratches an blots in the photo. The Dust and Scratches Filter is located on the Menu Bar and click on the Filter Tab. A drop down will list elements and then he can choose the Noise tab and select on the Dust and Scratches.
2. After clicking on the Dust and Scratches menu, a window will pop up with two control sliders. The first slider is for the Radius and the other one is for the Threshold. There will also be another window if the preview box will be checked. These are the main options that will be used in treating the picture.
3. Adjusting the Radius slider may remove the scratches. However, there is a tendency that overdoing it may make the edges blurred too. If that happens, the option is to adjust the Threshold slider and this will allow the details to go back and make the picture clearer with the scratches disappearing. The person should be careful not to set them too far or it will only create blotches on the picture.
4. In removing the marks, selecting the whole photo will not diffuse these marks. The option is to select only the part where the scratches are located. He may use the Lasso to do this.
5. He can then feather the edges of the selected area so that the selected area will not be obvious on the picture. He can do this by clicking the Feather option and click the Scratch and Dust Filter again. He can do the process again of adjusting the Radius and Threshold sliders to get the texture needed and remove the scratches.
6. It there are still visible marks on the other parts of the picture, he can do the technique again by selecting the areas he would like to adjust. To finish the process and make the picture presentable, he can crop the image enough to remove the cracks and torn edges of the picture. The canvas may be use to equally crop the image.
7. A person may add drama on the picture by adding a drop shadow on it. This will make the picture appear as if it has been lifted off the page. The color may also be removed using the controls Shift+Ctrl+U. He can then add color by putting a little amount of Sepia. He can do this with the Hue or Saturation tab. The contrast may be adjusted using the Levels option.
This is one easy way on how to remove the blotches and marks on an old picture. This is also a good way to make the picture look new but still appear classical. It will be a pleasant and easy way to display pictures kept on old albums and cabinets for a long time.
About The Author
Michael Wysmierski is the founder of Professional Header Templates. He can be reached for more information at his website here: http://www.ProfessionalHeaderTemplates.com
mw@professionalheadertemplates.comLabels: tutorial |
| posted by acca @ 2:25 AM |
|
|
|
|
|
|